Wednesday, November 24, 2010

Rock Your Christmas Card!


My 3 sweet munchkins with Santa last year. :-)

I read an article recently in which a magazine reader asked, "In this day and age of e-mail and facebook and instant technology, Christmas cards seem a little old-fashioned. Should I even bother to send any this year?" I would like to answer that question with a resounding "YES!!!!" Yes, they are old-fashioned, and that is what I think makes them so great. When you walk into someone's home you don't flip open their laptop and start surfing their facebook account. You do, however, peruse the photographs and cards fixed to the fridge and say, "What a cute kid! Is that your niece?"

Now, more than ever, is the time to go back to the days of ink and paper and stamps and envelopes and show friends and family that you can put a little more heart into their Christmas greeting than a click of a mouse. There is something meaningful about holding something in your hand that came from the hands of another, and it is a special experience that I, for one, will never give up!

One year, being my crafty self I decided to hand-make all of our Christmas
cards. Were they pretty? Yes. Did it make me crazy? Most definitely. Luckily, with sites like Shutterfly you can do all the hard work with just a few clicks- no glue stick required! I was just checking out Shutterfly's immense collection of holiday photo cards, and I got even more excited to start designing my own. What I love best about their collection is that you can add not just one, but up to 12 (yes, TWELVE!) photos to your card! My friend, the budding photographer, gave us a great deal on our family photo shoot and I loved pretty much every shot she sent me, so I'm just glad I don't have to pick just one!

Shutterfly also has every design you could hope for, from modern to classic to downright funky. If you still need an idea for your family photo, an online photo card site like Shutterfly is a perfect place to get some inspiration. Once you're ready to design your own card, the other great thing about Shutterfly is that they work with your budget- you can search the cards by price! Perfect! If you're more concerned with the design, you can search by the number of photos you want to use, the format (flat or folded), paper type, card size, color, or designer. I just love it when these places make it simple for me.

Once you get hooked on their photo cards, you can check out all the other fantastic ways you can use your family photos, with everything from birthday invitations to wall calendars (Christmas present for the grandparents, anyone?) and more!

I'm off to go design mine now...I'll be sure to take a pic when they arrive!!

Thursday, November 18, 2010

Spiritual Sundays: Thankful


For the beauty of the earth,
For the beauty of the skies,
For the joy which from our birth
Over and around us lies,
Lord of All to Thee we raise
This our hymn of grateful praise!


What are you thankful for this holiday season?

Tuesday, November 16, 2010

Thanksgiving Placecards


I never have time to do papercrafting, so I always try to find good excuses to sneak it in...this time it was to make these elegant little Thanksgiving placecards to be sold at a silent auction to benefit my daughter's preschool. With Thanksgiving coming up next week, I thought they would be both beautiful and useful- a great combination when it comes to a silent auction!

If you've never done papercrafting but you'd like to give it a try, placecards are a great place to start. For these I simply picked out some patterned paper I liked at Michaels, then teamed it up with two solid colors of cardstock and matching embellishments.

Use a solid color 12x12 piece of cardstock and cut it into 9 4x4 squares. Each of these will be folded in half (or "tented") for your placecard. Then simply cut the patterned paper slightly smaller (or not, as seen below- I just made it 2x4 to fit the front of the placecard) to serve as your mat, then cut the other solid cardstock smaller than that and adhere it on top.


Some helpful hints:
- Ink the edges!! It will give it a more finished look. Take an ink pad and simply run it around the edges of the paper. Using a brown ink pad and scuffing it along the edges will give it a nice aged look.
- Use a paper cutter for quick, straight lines. These run about $10 and are SO worth it!
- Corner rounders or paper edgers (like scissors that cut a pattern into the paper) can add interest and class to your project.
- Use the right adhesive- a glue stick will work fine for bonding paper to paper, but if you are adding any kind of fabric or metal embellishments, you might want to consider glue dots or special double-sided tape made specifically for those kinds of materials.

Have you crafted anything for Thanksgiving? Leave a comment and share!

Saturday, November 6, 2010

Short & Sweet: Fairy Calendar Art!


Remember my goal of doing non-novel-length posts? Well, I'm going to give that a shot again! I was at my favorite bargain spot, the Goodwill Outlet, When I spotted this beautiful calendar. It was outdated, of course (2008) but I just loved the art in it, so I bought it for $0.25.

I brought it home and dug out some 12x12 LP/scrapbook frames I'd bought at Michaels awhile back on sale for $5.00 each (I've found they often go on sale at this price). I had intended to use them for some of my favorite scrapbook pages, but I never got around to it, and they were perfect for these calendar pages. I had Starlet pick out her two favorite, which I also loved, because the one on the left looks just like her and Little Boo together, and the one on the right looks just like her dancing with big brother Monkey playing the flute in the background!


Cut, framed, and on the wall in the girls' room! Ta-da! Instant fairy art. You could do this with any old calendar if it's got great art you want to save. Could I have been a little more creative with them? Yeah, but I'm trying to keep it simple, remember?

Got any super-simple beautiful thrifty projects to share?

Friday, October 29, 2010

The Great Halloween Feast

Since I pretty much fell off the face of the blogosphere last year, I thought I'd share some photos from our "Halloween Feast of 2009". It wasn't actually a feast- more of a nice dinner, but I decorated more than usual because we were supposed to have family come and have a real feast, but Starlet was sick with strep throat so we decided to keep our germs to ourselves and the rest of the family took the feast elsewhere. There's still time to dress up your table if you haven't made preparations already- here are some ideas that might help you out!


I purchased most of the decorations from the Dollar Tree- the only ones we already had were the large candleabra and the wall sconces (and the framed picture, of course, but that's always there with the sconces).


We just used a black plastic tablecloth and paper plates and napkins.


I really think that the candles were a nice effect. I especially loved putting candles right in front of these little gargoyles to illuminate them. Creepy.

Peat moss also looks quite creepy when paired with some random plastic skulls scattered about!


For dinner I made Dinner in a Pumpkin (find the recipe here) along with cornbread pudding. Yummm.


Here's hoping you have a spooooooky Halloweekend. :-)

30-Minute Toasted Pumpkin Seeds! YUM!


I'm a little pumpkin, orange and round!
Here is my stem, there is the ground.
When I get all cut up, don't you shout!
Just open me up and scoop me out!


We had family pumpkin carving night last night! Well, we had kid pumpkin carving night last night. They had a blast and each made up their own designs (well, Little Boo had help from Daddy).


The pumpkin in the middle is Monkey's. He decided he wanted it to be scary- the mouth on the forehead, an eye next to the nose. He said that he wanted it to be really scary so that it would scare all the trick-or-treaters away and we could keep all the candy for ourselves. Hmm...I like the way he thinks...

Today Starlet and I made our family's favorite toasted pumpkin seed recipe. It's super easy, and if you've never roasted your pumpkin seeds before, I recommend having a box of tissues handy after you make your first batch. You will be shedding tears for the thousands of pumpkin seeds that have gone to waste over the years. It's a tragedy, really.


Ohhhh the golden crispy deliciousness! Here's the recipe:

No rinsing or soaking required- just get rid of any guts still clinging to the seeds.

1. Preheat oven to 400 degrees.

2. Bring salted water and seeds to a boil- 2 cups of water to every half cup of seeds; 1 tablespoon of salt to every cup of water. (I usually reduce the salt by about a quarter- today I did 2 cups of seeds and I omitted 2 of the tablespoons of salt and they were just fine)

3. Reduce heat and simmer for 10 minutes, then remove from heat and drain water from seeds.

4. Spray a cooking sheet with oil. Spread seeds across the pan in a single layer. Bake for 20 minutes at 400 degrees until golden.

5. Take them out of the oven and allow to cool. Then start eating them, realize you can't stop and devour the entire batch.

6. Go to the store,buy more pumpkins just for the seeds, make new batch, repeating steps 1-4, and this time instead of starting to eat them, put them in an airtight container and hide them where only you can find them. Because then you won't have to share.

The end! Enjoy those yummy seeds!!!

Do you have any tasty pumpkin recipe traditions? Leave a comment and share!!

Sunday, October 24, 2010

Spiritual Sundays: Chester the Church Mouse


"Reverence is more than just quietly sitting..."

Yeah, but quietly sitting is an awfully good start, don't you think? We have been having some serious problems with quietly sitting at church, and so I decided that a Family Home Evening lesson on reverence was in order.

I searched the internet looking for ideas that might help with my reverence topic. One of the first sites I found was from The Family Home Evening Spot. It was there that I found this poem:

“What If … ?,” by DaLee C. James, Friend, Sep 1996, 22

If a mouse would ride to church
In your pocket on this day,
What might he tell his family
That he heard you do or say?
Would he tell them you were reverent,
And you listened to your teacher?
Or would he say he’d never seen
Such a noisy creature?
Would he tell them how he loved the songs
You sang so sweet and clear?
Or would he groan from all the talking
That entered in his ear?
Could he take a little snooze
As you walked nice and tall?
Or would he scream with panic
As you galloped down the hall?
Would the little mouse get seasick
From the tipping of your chair?
Or would he feel safe and cozy
As you quietly sat there?
Would the chapel be a reverent place?
The sacrament the same?
Now tell me, would the little mouse
Be really glad he came?
If a mouse would ride to church
In your pocket on this day,
What might he tell his family
That he heard you do or say?

I LOVED this little poem, and I knew that my kids would love it, so I decided to actually make a little mouse and call him Chester the Church Mouse. I created him in about 5 minutes using an old baby sock, a rubber band, some felt, googly eyes, my hot glue gun, and a permanent marker.

After reading the poem to the kids, I picked the child who was being the most reverent while listening and I told them where Chester was hiding. The child brought Chester in to Family Home Evening and I explained to them that Chester was going to come to church with us on Sunday. During Sacrament Meeting (when we are all in the chapel/sanctuary together) he would sit with whichever child was being the most reverent. He did not like to be around loud noises or wiggly children, so the person would have to be very quiet and still, or else Chester would want to go somewhere else.

Well, Chester made the journey to church with us today and he had two very reverent children to sit with. When one of them would start to get a little wiggly or noisy, I would *help* Chester move over to the other one who was being quiet. On occasion, the children would forget about Chester even being there and start to get a little rambunxious, but once they saw me move Chester, they would remember and get very quiet and still again. And they were very pleased to have him come back and sit with them.

I'm sure Chester probably won't be with us forever, but the goal is to have him be the reminder and to get the kids into the habit of being quiet and reverent at church. It was such a relaxing experience for me to actually be able to sit and listen without constantly saying, "SHH!", breaking up arguments, and trying to keep them from kicking the backs of the seats!

Here's to Chester the Church Mouse.

Anyone else have any tips or tricks for reverence, or any other FHE ideas that have worked well for your family? Leave a comment and share!

To learn more about what I believe as a member of the Church of Jesus Christ of Latter-day Saints, visit www.mormon.org.

Wednesday, October 20, 2010

The Perfectly Imperfect Goodwill Butterfly


Meet Mr. Wooden Monarch Butterfly. He is getting ready to get painted. Don't get me wrong, I love me a good monarch butterfly, but he doesn't go with my daughter's room. And he only cost about 25 cents. Sorry Mr. Wooden Monarch Butterfly. Your black and orange just have to go. So we spray-painted him white.
Since he was to live in Starlet's room and I am trying to spend more quality time with her, the two of us (well, three if you count Mr. Wooden Butterfly) sat down with some mod podge and sponge brushes and some paper shapes cut with my Quickutz (I let Starlet choose the patterned paper and pick what shapes she wanted) and went to town. She only let me mod podge two of the shapes.


Is it perfect? Nope, far from it. I should have sanded down Mr. Butterfly's rough spots and probably primed him first (once a monarch butterfly, always a monarch butterfly) and I don't think I personally would have chosen to place the big flower right on his little body, but he now hangs in Starlet's room over her bed as a happy reminder of a fun afternoon. He looks like he might even land on her giant Pink Metal Goodwill Flower. Fun times.


Have you done any perfectly imperfect projects lately? Leave a comment and share!

Wednesday, October 13, 2010

Goodwill Goodies

So today I hit my favorite place to shop- the Goodwill Outlet Store! All of the following items cost me less than $5:

First, how cute is this shelf? I know, it's completely random, but the wood color matches my kitchen and living room finishes and the wood tones in my office. And it's a teeny tiny street scene! Behind glass! It's just one of those things that I can imagine my kids staring into and dreaming of the little people going into the little stores. (okay, I admit it- I'll be staring into it and dreaming of the little people going into the little stores too...)


Speaking of tiny cute things, check out this bookend/pencil holder/mail holder!


And last but not least, these two beautiful little music boxes. Well, technically the one on the left isn't an actual music box- it's just a small pedestal/stand thing that plays music. The one on the right has a clear plastic piece inside that allows you to see the workings of the music box- the kids loved that one!

Here's a closer look at the pretty shamrock inlay in the music box. I am a box person, I
can't help myself!


Have you found any beautiful thrifty goodies lately? Leave a comment and share!

Monday, October 11, 2010

CVS Savings


Along with trying to get back into blogging, I've also been trying to get back into couponing. I've been able to hit CVS the last couple of weeks, so I went in with $8 in Extra Bucks to spend. I did two transactions:

1. Azo Itch Relief- on sale $6.99, get $5 ECBs, used $2/1 printable
Colgate Total Advanced- on sale $2.99, get $2.99 ECBs, used $1/1 coupon from 10/3 SS
Dial 3-pack bar soap- on sale $1.99, get $1 ECB, used $0.35/1 coupon from 10/10 RP
Dawn Hand Renewal- on sale $0.97, used $0.50/1 coupon from 9/26 P&G
Brach's Candy Corn- on sale $0.99, used $0.99/1 coupon from CVS coupon-printing kiosk (woohoo!)

Total after coupons and ECBs = $1.41

2. 6 Renuzit Adjustables- on sale $0.88 each, used buy 6 get 6 free coupon from 10/10 RP

Total after coupons and $2 ECBs from first transaction: $0.85

So I spent $2.26 total out of pocket and I now have another $7.99 in ECBs to use next time (same amount I'd brought with me!)! Could I have done better? Probably, but I was tired so I didn't feel like getting all mathematical. And I forgot to ask for a raincheck on the Purex 3-in-1 sheets (B1G1 @ $7.99, use 2 $3/1 from 10/10 RP = $0.99 each) but oh, well! I'll stop at another CVS later this week and see if they've got them. :-)


Have you gotten any good deals this week? Leave a comment and share!!

Friday, October 8, 2010

The Perfect $5 Fall Jacket


The last time I posted I mentioned going to the Goodwill outlet where I picked up a very fine crock. I also snagged this super cute fall jacket- don't you just love the red color and the gorgeous pattern in the lining? Because the Goodwill outlet is pay-by-the-pound, I am pretty sure I paid less than a dollar for this jacket (I bought ten items and paid $7 total...you will see more of those items in future posts!). The only problem was that it had two buttons missing!

I was going to be in the neighborhood of a fabric store today, so I brought the jacket with me so that I could match up some buttons and thread (and buy needles...how sad is it that I don't have needles??!). I found some buttons that weren't an exact match, but they were close enough that you wouldn't really notice a difference unless you were actually comparing buttons. I spent less than $5 on materials.

After a few minutes of handiwork (and only a few expletives), voila!


How cute am I? LOL! LOVE the color and LOVE the fitted look. I can't wait to wear this to the pumpkin patch next weekend. ;-) (by the way, a special thanks to my husband's grill and the timer on my camera for taking this lovely shot)

Have you picked up any great thrifty finds lately? Leave a comment and share!

Wednesday, October 6, 2010

Comeback Take 2?


I have been so inspired lately by surfing from gorgeous blog to gorgeous blog (Abby's Garden, The Shabby Chic Cottage, and A Little of This, A Little of That) and I realized- I WANT TO BLOG!!! Problem? As always, TIME!

But today I came to a realization: I can still blog, just maybe on a slightly smaller scale. I don't have to publish a fully illustrated novel every time I post. So I shall start now, with the photo you see above. Ahem.

This morning I was watching Martha Stewart (I call her my grownup Mr. Rogers) and she was addressing viewers' kitchen organization problems. A photo popped up on the screen, and I thought, How on earth did Martha get a picture of my kitchen utensil drawer???! Well, of course it wasn't my drawer- it was a viewer's, and Martha shared her advice: clear out some space in that drawer by gathering some of your more frequently used items and place them together in a container (I believe she used the word "crock") on the countertop.

Now, I know that this is not rocket science. I have seen these "crocks" at many people's houses, but for some reason today I thought, Yes! A crock! That is what I need! And I happened to be going to the Goodwill outlet. So while I was there, I put myself on the lookout for my very own crock and I spotted this little beauty. It is simple, solid, a perfect size, and come on, who doesn't love sugar?

The end.

P.S. Crock crock crock. I just love that word. Crock.

Sunday, September 5, 2010

A Fairy Special Birthday!


It's hard to believe that my little fairy princess turned ONE on Thursday! It was enough to make me want to blog. ;-) Well, the party did, anyway! I feel bad abandoning my blog, especially when I spend so much time gawking at so many other FABULOUS blogs like Penny Carnival, I Make Stuff, and Thrifty Decor Chick.

So I have returned to share this beautiful party with you all! All parties must start with a theme, and ever since Little Boo was born people have told me she looks like a little elf. Well, I wasn't really into the whole 'elf' theme, but I thought maybe we could play off of that and do a 'woodland fairy' theme! So I set up a little photo shoot in the back yard and took many adorable fairy photos of my very photogenic angel. It took me all of 5 minutes, and the photos are just precious! I included one on the invitation along with a poem that said,

Peek into the garden and what do you see?

A sweet little fairy sitting under a tree.

Her name is Little Boo and she’s turning one!

Won’t you join us for an afternoon of magic and fun?

Then of course I added the date, time, and place (by the way, I did not write this poem- I found it on another website, but for the life of me I can't find it now! Sorry!). I wanted to include a picture of the invite on here but they were e-mail invites (I got going on this kind of late...happens when it's the third child!) and I couldn't figure out how to turn my Word document into an image file.
Anyway! Let's move on to decorations, shall we?

This was the setup for the food table. I just used a green sheet which I spray-painted with some glitter paint (you can't really see it in this photo) and then I bought fake flowers from the dollar store and popped the blossoms off the stems (the kids had a blast helping me with that part) and sprinkled them about the table in a whimsical fashion!
On the menu were these lovely little nests filled with dijon chicken salad...


Some delicious toadstools...


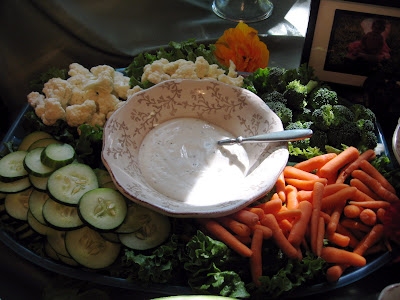
A garden bounty platter (aka, veggie tray)...


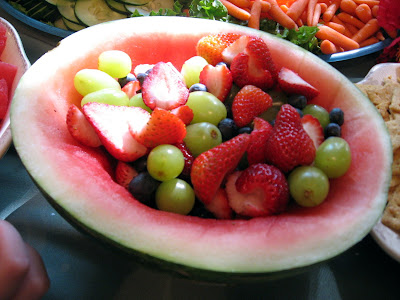
And of course some fairy fruit salad!


Here are a few of the cupcakes on display- I didn't want to overwhelm the table by putting them all out, but they were so pretty I had to display a few of them! I purchased just the iced cupcakes from Wal-Mart (their whipped icing is SOOOO GOOOOD!) and then I purchased the tiny sugar flowers and butterflies from a baking supply store. I also bought edible glitter which I sprinkled over several cupcakes.

You might have also noticed in the 'tablescape' that there was a little stand of minature cupcakes off to the side- this stand was actually a votive candle holder, but the mini cupcakes fit into it perfectly! I made Little Boo's smasher cake separately, and I had plenty of batter left over (her cake was just 6" around) so I thought the little bitty cupcakes would be kind of fun and cute. :-)

We played two little games at the party; for the first, we had Little Boo sit in her high chair in the living room. All the guests gathered around her in a semi-circle, and everyone got a sheet of paper and a pen. When I said, "go," everyone had 10 seconds to draw a picture of her. After 10 seconds, they had to pass their paper to the person on their left. I then started the time again and the next person had to continue the drawing. We repeated it several times until the portraits were complete! There was quite a lot of laughter and groans, especially when people got a picture and they couldn't even tell what it was!! I gave the younger kids pieces of paper and put out crayons so they could just draw their own pictures without having to participate in the paper-passing. Little Boo loved being the center of attention!

The second game began with me reading a tiny scroll, supposedly left for us by the fairies. In it the fairies explained that they found out it was Little Boo's birthday (Serendipity Squirrel saw us getting ready through the kitchen window) and so they had snuck into the house and left fairy wishing stones for all the guests to help us celebrate. I had gone to a local store that specializes in gems and unique rocks and raided their $0.25 bin for cool-looking rocks, and the kids helped me hide them all over the living room (above Little Boo's reach!). We had little gold and silver favor bags with tags with each guest's name on it for them to put their fairy wishing stones in. The reverse side of the tag read,

It's time to celebrate the birthday of a precious little girl!
You are a special person in her "fairy" little world.
We are so happy to share this magical time with you;
This wishing stone will bring you luck and help your dreams come true!

And yes, I did think that poem up myself! :-)


A few other little party touches:

- We printed up some wallet-sized prints of Little Boo's fairy photos for our guests to take home with them (we had mostly family come).
- Plates and napkins were a simple solid pale yellow from the dollar store.
- I used green leaf lettuce as 'bedding' for the nests and the veggie tray, which was a simple touch that really made them look nice.
- We had notecards and pens and a basket with a sign asking guests to please write a note for Little Boo for her to open and read on her 16th birthday.
- A few of the decorations, the notes, the portraits from the game, and prints of photos I took at the party will all go into a time capsule for Little Boo to open when she turns 16.
Just so you know, I found many of the recipes I used by simply going to a recipe site and typing in search terms of things having to do with my woodland fairy theme, like "fairy", "nests", "flowers", etc. This would work with any theme you choose- just envision it in your mind and start typing in words that describe what you're going for!

Hopefully I will be back soon with more beautiful thrifty ideas for you! School starts this week, so it'll just be Little Boo and me at home. I'm going to try to make naptime productive!

Thursday, June 24, 2010

GIMME!


You know how I'm always talking about ways to save money and still have fun? And do you recall how awhile back I did a post on winning things? Well, for years I have wanted one of these Silhouette craft cutting machines- I see it on tv and start getting very needy and want-y. Now one of my favorite blogs, Thrifty Decor Chick, is having a Silhouette giveaway! GET OUT! So I really want to win it. And posting about it here was one way for me to enter. And I really want to win it. So I'm posting about it here. Because I really want to win it.

Did I mention that I really REALLY want to win it?

K, just checking. So go check it out! SOO awesome!

Thursday, June 10, 2010

A Summer Transformation

This time last summer, our dining room looked like this:


It was dark, it was moody, it was elegant, it was....hardly ever used. The white chair cushions made it impractical for everyday dining, and on formal occasions when guests were joining us it rarely provided enough room for everyone to squeeze in. We usually preferred to dine in the kitchen where the table would seat eight with the leaf in, and cleanup was a snap.

So I begged. I pleaded. I argued. I rationalized. And finally I convinced my husband that our neglected dining room would much better serve our family as a bright and happy playroom! So after much creativity and hard work, by the end of the summer it looked like this:


See how happy the kiddos are playing in there?

Well, it was quite the transformation, but it was done on a budget, and over the next week or two (or three, depending on how often I get around to posting) I will share how we did it without breaking the bank.

I am delighted to report that this room is now used and enjoyed by all members of our family, and it is one of my favorite rooms in the house thanks to the bright cheerful colors and clean finishes. The main thing I learned in doing this transformation is that you have to make the space you have work for you. My husband was so ingrained with the idea that we HAD to have a dining room, and it took a lot of persuasion to get him to realize that a dining room just wasn't working with our lifestyle right now. I felt like the square footage in that room was just dead weight that wasn't serving our family. So we cut ties with the idea of a dining room (for now) and created a fun, functional space that serves our needs.

Is there a space in your house that isn't serving your family? How can you transform it to reflect your needs and wants without spending a lot of money? Leave a comment and share!

Wednesday, June 9, 2010

Could Rite Aid be my new best friend?

$1.01 at Rite Aid...


I ran into a couponing buddy yesterday at Wal-Mart and I bemoaned the fact that I just hadn't been seeing any good deals around lately. She said she'd been frequenting Rite Aid and finding lots of good deals, and she told me about a few, specifically, a deal on Pampers wipes. So when I got home, I did some research of my own and this is how my trip went today!

**NOTE: All prices listed are only good with your Wellness card**

- 4 boxes of Pampers wipes $2.49 each
- 2 bottles Old Spice Body Wash 2/$7
- 3 packages of Carefree pantiliners $0.99 each
- 1 bottle of Lubriderm lotion $3.99
- 1 bottle of Dawn dish soap $0.99

I used these coupons:

- 4 $2/1 Pampers wipes
- BOGO Old Spice Body Wash
- 3 $1/1 Carefree product
- 1 $3/1 Lubriderm (in-ad Rite Aid coupon)
- 1 $2/1 Lubriderm printable
- 1 $0.25/1 Dawn
- 1 $5/$25 Rite Aid coupon

I ended up paying $1.01 out of pocket, and I got a coupon on my receipt for $4 off my next Rite Aid purchase, so I made $3 today! Not bad for my couponing comeback!

For those of you who haven't heard, Rite Aid is now doing a new program that appears to be just like the CVS Extra Bucks program- that's what that $4 coupon on my receipt was for (from the body wash deal).

Glad to be back in the game! Have you been couponing lately?

Sunday, May 23, 2010

Give Yourself Some Love!


I realized last week that I was tired of cleaning, tired of clutter, tired of never feeling like I was ever caught up with anything! (can anyone relate?) I decided that I needed to find someplace to declare a sanctuary, and I decided that my bedroom would be it.

You know how it is, you get married, you "nest" and get pretty bedroom furniture and linens and hang nice stuff on the walls and then the kids come along and over time, your room gets filled with piles of little clothes, random toys, diapers, and pretty much anything else that doesn't have a home in the rest of the house because nobody sees your bedroom except you, right? And all that pretty stuff is still there, it's just buried under all the junk!

So here is my beautiful thrifty challenge to you this week: CLEAN YOUR ROOM! Ditch the clutter, dust the pretty furniture, hang another picture, and vacuum the floors. Then, grab one of those candles that have been gathering dust on your dresser and LIGHT IT! Make your room a sanctuary. Then get in bed 30 minutes earlier than usual, turn on your bedside lamp and read a good book or thumb through a favorite magazine. Trust me, you'll feel renewed! (don't forget to blow out the candle before you doze off to dreamland, though!)

After you've created your sanctuary, be sure to protect it! Keep it off-limits to anything that doesn't make you feel peaceful and calm. My new decluttering question is: If this item were to get ruined or destroyed, would I feel a) sad or b) upset because I would have to replace it? If I would not feel either of those things, then it's probably something I don't need. For example, my closet is filled with extra linens. If that tan comforter got torn up somehow, would I be totally bummed because it was a favorite? No. Would I be concerned about replacing it with a new one right away? Nope, not really! Goodbye comforter! You'll find that there are a lot of things you can do without, and releasing the weight of all that clutter is freeing! You'll have more breathing room, less stuff, which means that cleaning will be easier and take significantly less time.

So make yourself a sanctuary, a place that you can escape to, even when there are piles of laundry on the floor in the laundry room, dishes mounting in the sink, and dust bunnies chasing each other through the halls. Give yourself a place where the only person you have to clean up after is you, and where you love yourself enough to not make yourself work too hard, and where you can light a candle, put up your feet and relax. Enjoy!

Do you have a sanctuary? If not, are you going to create one? Leave a comment and tell me about it!

Related Posts Plugin for WordPress, Blogger...