Thursday, March 21, 2013

Home-based Preschool: X is for X Marks the Spot and X Ray!

Seems like these are the only posts I have time to do these days. Well, other than that Shabby Apple giveaway. Did you know that if you enter, like a dozen of those giveaways you have a pretty good chance of winning one? LOL! But that’s for another post...ahem. Anyway.

X Marks the Spot

So this week I had the good fortune of having my turn for our home-based preschool land on the letter X! (We do one letter a week.) Because it was the day after St. Patrick’s day, I thought it would be fun to do a treasure hunting, x-marks-the-spot theme.

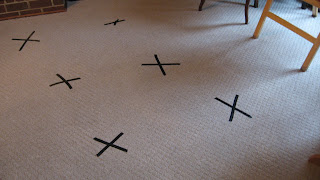
The kids got a hint of our letter for the week as soon as they came into the living room, where I had used black electrical tape to make x’s on the floor for each child to sit on during our circle time. This set-up actually worked out really well- they weren’t all over each other like they usually are on the blanket and they weren’t playing with them like they were when I used foam squares.


Then we sang the alphabet song, but when we got to x we clapped instead of singing it. Then I told the kids that today we were going to have Leprechaun Training School. Leprechauns use a letter x to mark the spot where they keep their treasure, so we have to know how to find the letter x. I had the kids do an x hunt on the white board:


Each child had a few turns to come up and x out a letter that wasn’t an x, and then each child got to circle an x.

Next was snack time! We had Lucky Charms which we sorted, and we also looked for the x’s in them.


And we ate plenty of them as well, of course. :-)


After our snack we played for a little bit, then came back for our craft. Leprechauns need a lucky shamrock, so we made some with paper, glue and felt.


 I made these papers that read, “X Marks The Spot!” and cut some hearts out of felt, which became the leaves for our lucky shamrock.


I gave each child a small cup with about a tablespoon of white glue in it and a paintbrush. They “painted” their heart leaves with the glue and then put them in the right place, then added the stem. They did a great job!


After some more play time we came back to our x’s on the floor and read some stories and did a “5 Little Shamrocks” rhyme using the felt board and counting on our fingers.

After that, it was time for a treasure hunt!! I told the kids that a tricky leprechaun had left us a fun treasure hunt and told me where the clues were, and that I was going to give them hints but they had to do it themselves (after all, they were in training to become leprechauns).


Here’s how it worked: I created a treasure map that showed the route to the treasure. (Dora style!) We started in the kitchen.  I told the kids that in order for us to get to the treasure, we had to find the clue that would tell us how to get to the next room (the purple slips of paper with a question mark on one side and instruction on the other). In the kitchen I had a paper that had pictures of different parts of the kitchen: the table, the fridge, a cabinet, etc. (the photo above shows the one I did for the playroom). When we entered the room, I got out the paper and a marker. I gave the marker to one child and said, “The leprechaun told me he did NOT hide the clue near the table.” The children would take turns drawing an x through each place the clue wasn’t, and we would look for the clue in the last spot left.

The clues said things like, “Crab Walk”, “Hop!”, and “Crawl”. We would do whatever it said to get to the next room, which was kind of funny. :-) We finally found the treasure in the cabinet in the bathroom- gold covered Rolos!


Ha ha, they were excited.


The kids had some more free play time while I got our lunch ready. We only had 4 kids that day, so I made a single green cheese quesadilla (used some of those green tortillas that Mission makes) and made an X in it to cut it into 4 pieces. I also gave the kids apple slices, and I told them that if they had passed their leprechaun training, then when I sprinkled some special leprechaun dust (lime jello powder) on their apple slice while they were holding it, it would magically turn green!


Little Boo was so excited that she passed!


I also served veggie straws and pretzel sticks so the kids could use them to make an x. This Hello Kitty cutie did a great job with her x’s!


And how about this adorable little leprechaun?


 Too cute!

X is for X Ray

On Wednesday we did X is for X Ray! We started with circle time and I showed the kids this cute video about the letter x. I let each child take a turn using a straw to point to the x’s on the screen. 

Then I introduced the X is for x ray theme by showing the kids some x rays we had from when my husband had been in a car accident many years ago. We talked about how we all have bones in our bodies and we felt some of our bones. Then we ATE some bones for snack!


Aren’t you loving Little Boo’s hair? LOL!


I made these bones using pretzel sticks and mini marshmallows. Just stick the marshmallows in each end and then dip them in white chocolate. Yum!


After snack, we did our x ray craft. I traced the kids hands using a white crayon on black paper. Then I gave them each a cup of glue and let them dip each end of Q-tips in it and stick them to their paper like bones.


After our craft, we had some play time, then we sat back down to read some books that helped us learn about some of our bones. We sang “Head, Shoulders, Knees and Toes” and then we watched and danced along to the Skeleton Dance.

After our dancing, we had some X Ray Tech Training by playing “Guess the X Ray.” I had gone online and found several x ray images which I showed to the kids and had them guess which body part it showed. I also threw in a couple fun ones like this one to make them laugh:


Once they had completed their X Ray Tech Training I put them to the test and we played Doctor. I had one child pretend to be the patient (who complained of some kind of pain), and the other was the doctor. They did a brief checkup (listen to the heart, check the reflexes, etc.), and then the patient was told they needed an x-ray. They then entered our x ray machine (they went under the easel) and the doctor pushed some pretend buttons and made button noises (beep, boop, beep beep).


And out popped an x ray that looked something like this! You can barely see it, but I made it look like one of the bones had a break in it with a tiny letter x where the break was. The doctor had to look carefully at the x rays to find where the x was and circle it. Each child got their own x ray.


Now THAT is one cutie patootie doctor.


After all our doctoring, we talked about how important it is to keep our muscles and bones healthy so we don’t break them, and then we did some eXercising! I found this fun exercise video for kids. They loved it!


I think everyone was being elephants...

After that I sent everyone to go play outside while I prepared an eXcellent lunch:


And that was our eXtraordinary week!

Friday, March 15, 2013

Shabby Apple Giveaway

Just poppin’ in to share this faaaabulous giveaway- $75 for Shabby Apple! Sweet, right? I love their stuff.

Just head over to Blythe Ponytail Parades for your chance to enter. :-)

Screen Shot 2013-03-15 at 10.14.35 AM

Wednesday, February 6, 2013

Home-Based Preschool: R is For Rainbow

I’m back to tell about another fun day at our home-based preschool! It was my turn again this week and I ended up with the letter R. On Monday we did “R is for Rolling”, which seems random, but it worked out great. We rolled ourselves, we rolled balls, we tried rolling different objects down a ramp, we counted wheels on vehicles, we decided what vehicles roll and what don’t, we ate rolling snacks, we rolled our play-doh- it was a blast!

For today’s lesson I went with RAINBOWS!


Can you tell Little Boo is having fun? Behind her is the rainbow we “built” all together at the start of our lesson. I gave each child a piece of the rainbow and we stacked them on top of each other to create our rainbow. I had them sing the colors of the rainbow song from Mickey Mouse Clubhouse. I was originally going to use felt for the rainbow, but I didn’t have all the colors I needed. Construction paper and tape work just as well!

After we introduced our rainbow theme we had snack time- rainbow goldfish crackers. While everyone was at the table we did our craft- rainbow Froot Loop necklaces. Little Boo is wearing hers in the photo above. I just twisted the ends of two pipe cleaners together to make a longer one, then I had the kids string Froot Loops on them. 

After our craft we did some work stations.


Here are two of the girls trying out our “Rainbow in My Room”- a little gadget that makes a rainbow on your wall. My older daughter got it for Christmas from her grandma. 


I had an awesome friend help me out today by bringing some Montessori-type items so we could make work stations. She has studied some of the Montessori teaching methods and she taught me quite a bit. Here are two of the boys working on a tray with multicolored transparent chips. I had drawn a rainbow and written letters on it, and I instructed them to use the chips to cover the R’s. At this point I think they were just having fun with it, because the chips had a metal ring around the outside and you could use this great magnetic wand to pick them all up. They liked that part. But several of the kids (including these guys) did very well finding the R’s on the page.


Here’s another little friend working with marbles on a suction-cup dinosaur. She is practicing her fine motor skills by picking up each marble and placing it into a suction cup. 


Little Boo was having some fun drawing in the salt tray. Just put some salt in a cake pan and let them practice writing their letters in it, or drawing shapes.


You can’t really see them, but this little friend is using tongs to move little rubbery pom pom balls from a bowl into a plastic paint palette. 


Ta-da! She’s very proud.


We also had a work station for pouring rocks (another great R word), rolling (R!) a bamboo mat, and a large letter R which we had drawn lines on to make it look like a road so the kids could drive toy cars on it.


Here’s my friend Rosanne reading the kids a story in Spanish about Rhinoceroses. It’s a giant book, and the kids really liked it. We also read “I Am a Rainbow”, “Planting a Rainbow”, and “Dizzy Duck and Silly Goose Hunt for a Rainbow”. I also had “The Rainbow Fish” and “Elmer’s Rainbow” but we didn’t quite get to them.


We had a rainbow dance party where we played some songs about rainbows and I gave each child a rainbow streamer to hold and use in their dancing. I just made a ring out of a pipe cleaner and tied some fuzzy rainbow yarn onto it. 


So fun!


After our dance party the kids expended some more energy playing outside while I got our rainbow lunch ready.


And here was our rainbow lunch: hot dogs, cheese, pineapple chunks, honeydew melon, blueberry yogurt, and of course marshmallow clouds.


Everyone is eating their rainbows. YUM!


I think Little Boo liked her rainbow preschool day!

Do you have any more fun rainbow-themed preschool ideas?

Saturday, November 10, 2012

Warm, Yummy Deliciousness for 60 Tiny Calories


One of my favorite things about cold weather is hot chocolate- YUM! Nothing like cuddling on the couch with a nice warm cup of cocoa. Unfortunately, that hot chocolate isn’t very supportive of my efforts to lose the baby weight...at around 150 calories a cup, it doesn’t always fit into my nutritional budget.

Fortunately, I have found a delicious alternative that is too good not to share- it’s the low-cal version of this Hot Vanilla recipe. The original recipe called for regular milk and sugar. By simply substituting almond milk and no-calorie sweetener, I was able to make this for just 60 calories (that includes the whipped cream)! SWEET!


Here’s the recipe:

60 Calorie Hot Vanilla

1 cup almond milk
1 tablespoon no calorie sweetener
1/2 teaspoon vanilla extract
dash of cinnamon to taste
2 tablespoons light whipped cream

Heat almond milk, then stir in vanilla, sweetener, and cinnamon. Add whipped cream on top and enjoy!

As my 6-year-old would say, easy peasy lemon squeezy!

Do you have any favorite low-calorie alternatives to your favorite treats? Leave a comment and share! I need all the help I can get! ;-)

Thursday, November 8, 2012

Artsy Collages


Lately I’ve felt more like being artistic than crafty. I don’t know if it’s a desire to express myself or if I just want to play around- maybe both- but I’ve had some fun experimenting with collage and mixed media.

I started with the large envelope my Shutterfly order came in. Weird, yeah, but it was destined for the trash and it was a nice thick poster board material that looked like it could handle an onslaught of mod podge. 


Once I had my base, I started looking through old magazines. My goal for this piece was to do something fall-ish, maybe Thanksgiving-y. So I found lots of reds, greens, golds, and browns and started throwing them on there.


I was using home decorating magazines, so the images I got were full of texture- blankets, pillows, flooring, rugs, and flowers.


I mod podged them together, then once it dried I used a little cream colored acrylic paint and dry-brushed some character onto it. Then I used my Quickutz and punched “give thanks” out of old sheet music. Once it dried I outlined the letters with a fine tip Sharpie.

Next was this little gem.


This one was basically the same process (same Shutterfly envelope, same home decorating magazines) only I went with a girly shabby chic feel, inspired by one of the textures I hadn’t ended up using for my “give thanks” collage.


I went over everything with the same cream acrylic paint and then used some brown ink on the edges once it dried. Then I added a few touches of lace, some twine, a velvet flower and a button.


One of my favorite things about this one is that one of the images I used was a window looking out on a flowering tree, and you can just barely still see it in the background. It gives a soft, dreamy feel to it.


So that was my artsiness from yesterday. How about you- feeling artsy lately?
Related Posts Plugin for WordPress, Blogger...