X Marks the Spot
So this week I had the good fortune of having my turn for our home-based preschool land on the letter X! (We do one letter a week.) Because it was the day after St. Patrick’s day, I thought it would be fun to do a treasure hunting, x-marks-the-spot theme.
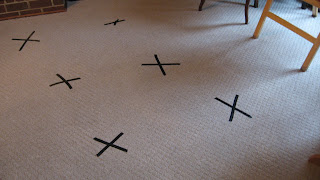
The kids got a hint of our letter for the week as soon as they came into the living room, where I had used black electrical tape to make x’s on the floor for each child to sit on during our circle time. This set-up actually worked out really well- they weren’t all over each other like they usually are on the blanket and they weren’t playing with them like they were when I used foam squares.
Then we sang the alphabet song, but when we got to x we clapped instead of singing it. Then I told the kids that today we were going to have Leprechaun Training School. Leprechauns use a letter x to mark the spot where they keep their treasure, so we have to know how to find the letter x. I had the kids do an x hunt on the white board:
Each child had a few turns to come up and x out a letter that wasn’t an x, and then each child got to circle an x.
Next was snack time! We had Lucky Charms which we sorted, and we also looked for the x’s in them.
And we ate plenty of them as well, of course. :-)
After our snack we played for a little bit, then came back for our craft. Leprechauns need a lucky shamrock, so we made some with paper, glue and felt.
I made these papers that read, “X Marks The Spot!” and cut some hearts out of felt, which became the leaves for our lucky shamrock.
I gave each child a small cup with about a tablespoon of white glue in it and a paintbrush. They “painted” their heart leaves with the glue and then put them in the right place, then added the stem. They did a great job!
After some more play time we came back to our x’s on the floor and read some stories and did a “5 Little Shamrocks” rhyme using the felt board and counting on our fingers.
After that, it was time for a treasure hunt!! I told the kids that a tricky leprechaun had left us a fun treasure hunt and told me where the clues were, and that I was going to give them hints but they had to do it themselves (after all, they were in training to become leprechauns).
Here’s how it worked: I created a treasure map that showed the route to the treasure. (Dora style!) We started in the kitchen. I told the kids that in order for us to get to the treasure, we had to find the clue that would tell us how to get to the next room (the purple slips of paper with a question mark on one side and instruction on the other). In the kitchen I had a paper that had pictures of different parts of the kitchen: the table, the fridge, a cabinet, etc. (the photo above shows the one I did for the playroom). When we entered the room, I got out the paper and a marker. I gave the marker to one child and said, “The leprechaun told me he did NOT hide the clue near the table.” The children would take turns drawing an x through each place the clue wasn’t, and we would look for the clue in the last spot left.
The clues said things like, “Crab Walk”, “Hop!”, and “Crawl”. We would do whatever it said to get to the next room, which was kind of funny. :-) We finally found the treasure in the cabinet in the bathroom- gold covered Rolos!
Ha ha, they were excited.
The kids had some more free play time while I got our lunch ready. We only had 4 kids that day, so I made a single green cheese quesadilla (used some of those green tortillas that Mission makes) and made an X in it to cut it into 4 pieces. I also gave the kids apple slices, and I told them that if they had passed their leprechaun training, then when I sprinkled some special leprechaun dust (lime jello powder) on their apple slice while they were holding it, it would magically turn green!
Little Boo was so excited that she passed!
I also served veggie straws and pretzel sticks so the kids could use them to make an x. This Hello Kitty cutie did a great job with her x’s!
And how about this adorable little leprechaun?
Too cute!
X is for X Ray
On Wednesday we did X is for X Ray! We started with circle time and I showed the kids this cute video about the letter x. I let each child take a turn using a straw to point to the x’s on the screen.
Then I introduced the X is for x ray theme by showing the kids some x rays we had from when my husband had been in a car accident many years ago. We talked about how we all have bones in our bodies and we felt some of our bones. Then we ATE some bones for snack!
Aren’t you loving Little Boo’s hair? LOL!
I made these bones using pretzel sticks and mini marshmallows. Just stick the marshmallows in each end and then dip them in white chocolate. Yum!
After snack, we did our x ray craft. I traced the kids hands using a white crayon on black paper. Then I gave them each a cup of glue and let them dip each end of Q-tips in it and stick them to their paper like bones.
After our craft, we had some play time, then we sat back down to read some books that helped us learn about some of our bones. We sang “Head, Shoulders, Knees and Toes” and then we watched and danced along to the Skeleton Dance.
After our dancing, we had some X Ray Tech Training by playing “Guess the X Ray.” I had gone online and found several x ray images which I showed to the kids and had them guess which body part it showed. I also threw in a couple fun ones like this one to make them laugh:
Once they had completed their X Ray Tech Training I put them to the test and we played Doctor. I had one child pretend to be the patient (who complained of some kind of pain), and the other was the doctor. They did a brief checkup (listen to the heart, check the reflexes, etc.), and then the patient was told they needed an x-ray. They then entered our x ray machine (they went under the easel) and the doctor pushed some pretend buttons and made button noises (beep, boop, beep beep).
And out popped an x ray that looked something like this! You can barely see it, but I made it look like one of the bones had a break in it with a tiny letter x where the break was. The doctor had to look carefully at the x rays to find where the x was and circle it. Each child got their own x ray.
Now THAT is one cutie patootie doctor.
After all our doctoring, we talked about how important it is to keep our muscles and bones healthy so we don’t break them, and then we did some eXercising! I found this fun exercise video for kids. They loved it!
I think everyone was being elephants...
After that I sent everyone to go play outside while I prepared an eXcellent lunch:
And that was our eXtraordinary week!


Awesome post! I've been teaching preschool in my home for over 20 years and I'm always looking for a new idea, especially for the letter X and other letters that don'e have as many resources. Thanks so much for sharing!!!
ReplyDeleteLove the ideas and creativity. Looks like great fun too :)
ReplyDelete