Sunday, March 27, 2011

Recycled Magazine Paper Bracelet


Lately I have been spending waaaay too much time browsing jewelry on etsy. I love the fun look of all the "upcycled" fashion accessories, so when I saw this idea for recycled magazine paper beads in the Family Fun magazine, I just had to try it!
Luckily, I had a few home decorating magazines sitting around which were chock full of gorgeous colors and textures, so with Starlet's help, I went through them choosing several colorful pages to use to create my beads.


Here is a page after I had cut it into fourths with my paper cutter. The great thing about this is that you'll only see one tiny part of the page- in this case, the bottom 1/2" or so of this piece. So even if something has words on it, it's not a big deal- you can use whatever part of the page you want. I even ended up with one of my beads having the word "harmony" on it, which I loved!

I started off by putting glue on the right side of the opposite end of the page- that way it would stick as soon as I started rolling it around the pencil.

Once I had my "initial stick" then I held it in place while I glued the rest of the sheet (wrong side).

After that, I just rolled it up using my pencil.

And there's the finished bead, which I cut in half to make two separate beads.


Here's Starlet stringing a bracelet for herself. I tied the end of the string onto a pencil to prevent her beads from sliding off the end.


And here's Little Boo. She wanted to be with us so I set her up in her high chair with paper and a pencil and some crayons. She had a blast.


Here's Starlet modeling her finished creations!

And here is my chic, upcycled/recycled magazine paper bracelet!! It's kinda gorgeous, if I do say so myself.

I would explain how I did the parallel beading, but I kind of just made it up as I went along. I'm sure there are probably tutorials out there somewhere!

Here's a few tips if you decide you'd like to make your own magazine bracelet:
- We tried patterned scrapbook paper, but it was a little too thick- the beads kept wanting to unroll.
- Use caution when cutting a larger bead into smaller pieces. They have a tendency to go flying across the room.

- Make all your beads before you start stringing them. I got excited and started stringing right away, before I had enough beads. I made more, but they were different colors than the first beads (because they came from different pages) so half of my bracelet looked kind of different from the other half. I think it's better to have the colors completely integrated for a cohesive look.

- Don't plan on wearing this if there's a possibility you may sweat (or have your hand/arm come in contact with moisture- like washing dishes, etc.). I had mine on tonight while I was out, and I had my coat on inside a place and I got a little warm- barely noticeable, but I started getting some very strange markings on my hand from my bracelet... I'm thinking if I do more of these I might look for some kind of clear coat paper sealant. :-)

This was a super fun project, and it's great for kids AND moms! And of course, my favorite part was that it was FREE!! I'm thinking I might make another one or two of these just for fun!

Have you ever made a magazine bracelet? If not, think you'll give it a try?

For another fun post on ways to use old magazines, check out My Secret Room.

This week I'm linking up to....


Transformation Thursday


125button

Spiritual Sundays: Your Highest Destiny


Today in our women's class at church, Relief Society, we talked about the principle of "consecration." Our lesson was based on a talk given by D. Todd Christofferson in the October 2010 General Conference of the Church of Jesus Christ of Latter-day Saints. In his talk he said,

"To consecrate is to set apart or dedicate something as sacred, devoted to holy purposes. True success in this life comes in consecrating our lives—that is, our time and choices—to God’s purposes. In so doing, we permit Him to raise us to our highest destiny."

Really, the only thing I want to do after reading that quotation is to jump up and shout, "AAAYYY-MEN!!!" I feel that way because I know this to be so, so, so true. For me personally, I feel that I have been blessed with certain gifts and talents, and I know that when I use those talents to serve God, He blesses me and magnifies my talents to levels higher than I could ever achieve on my own.

Recently, I have struggled with trying to find a balance in my life. There are so many good things that I want to do- spend time with my kids, go running, write on my blog, write in my journal, write...other things! I want to be able to make my home a clean and beautiful sanctuary, I want to study my scriptures, I want to serve my friends, I want to cook wonderful meals, I want to serve in the community, I want to be thrifty through couponing. These are all things that take time, and most days I feel like I'm just running from one thing to the next, frantically giving half of my attention to everything and therefore truly succeeding at nothing! It was turning into a very frustrating cycle.

After the women's conference, I chose to use the following Sunday, a fast Sunday, and dedicate my fast to asking the Lord to help me find balance. I realized that I couldn't do it all, and I shouldn't be trying to do it all- I am not superwoman, and I don't think God expects any of us to do everything all at once. There is a time and a season. My question for the Lord was simply this: What do I really need to be focusing on, and how do I organize my time to accomplish what you desire of me?

Throughout my fast I had a feeling of comfort, and a feeling that God was more than happy to help me with this struggle. It was almost as if He was saying, "Why Kasey, I'm so glad you finally asked. Yes, here is what I would like for us to do together...." I say, "us", because I really felt that He is as invested in my life as I am, and He wants me to succeed, and is ready and willing to give me all the support I could possibly need.

As I prayed, I got the strong impression that my writing ability is a gift, and while this is a busy time in my life, it is the time that the Lord has appointed for me to develop and nurture my gift. Earlier this year I had started work on a poetry project but I had set it aside for lack of time and inspiration. Oddly enough, as soon as I received the answer from Heavenly Father that He wanted me to continue work on it, I suddenly had the inspiration for 5 more poems!

My next step was to ask for guidance in finding time for that which the Lord has directed me to do. I felt impressed to create a flexible schedule, with certain nights each week dedicated to the things I wanted to accomplish. I now have one evening for couponing, one for blogging, and one for writing. The other nights are open for time with my husband and time to catch up on things I didn't get accomplished on the "dedicated" nights. Having a set schedule has allowed me to be disciplined and accomplish things that I might not have otherwise done. For example, a friend sent me a link to an LDS radio show in which various LDS authors were discussing their writing careers and how writing has affected their lives. The show was quite long- about an hour- and I had put it off because I just didn't have the time. I used my first "write night" (hey, I like that!) to listen to the show, and it was very inspiring.

[Side note: I feel that I should say that while writing is my most important "side activity" right now, my main daily focus is on my role as a wife and a mother. That is my first calling, and the one that will- and should- consume the majority of my time. However, I feel that by pursuing my talents and nurturing my creativity with the Lord's help, I will become an even better wife and mother.]

Sometimes consecrating our lives involves simply asking God what He wants of us. From our church lessons and the scriptures and other sources we get an impossibly long to do list. It can feel completely overwhelming. And yes, God does ask us to do it all. But He doesn't ask us to do it all right now. I believe that there is a time and season for everything, and when we consecrate our time and our choices to the Lord, He will direct our paths and in so doing, "raise us to our highest destiny."

I am so thankful to my Father in Heaven for guiding and directing my life each day. I am thankful for the talents He has given me and for His gentle guidance in helping me to use them to bless the lives of others. I pray that I might be an instrument for good in His loving hands.

Do you feel that you have consecrated your life, or certain parts of it, to God? Do you feel that doing so is helping to raise you to your "highest destiny"? I would love to read your thoughts on this!

For more on what I believe as a member of the Church of Jesus Christ of Latter-day Saints, please check out www.mormon.org. :-)

Thursday, March 24, 2011

DIY Disinfecting Cleaning Wipes


I have an inner brat who finds every reason possible to avoid cleaning. She's truly obnoxious. Lately, she's been whining that sure she'd clean the bathroom, if only she had some of those handy dandy cleaning wipes that she could just whip out and swipe across the counters. But since she doesn't have them, well...

So I decided I was tired of her whining, and rather than spend a bunch of money on expensive wipes, I decided it might be fun to try to make my own!

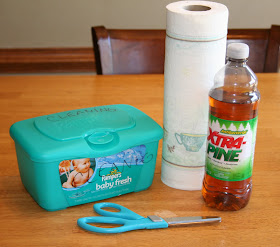
Because I didn't feel like trying to figure out a recipe for these on my own (that would be that inner brat again) I just found some instructions online here at Organized Home. I wasn't too into the idea of hacking a roll of paper towels in half and drilling through plastic containers, so I just used the paper towels individually (cut in half) and folded them such that they would conveniently pull through the opening in an old baby wipes container:

First, make an accordion fold like this:


Then, fit two half-sheets together like this:


Fit all the sheets together like that, then stack them in the container and add the solution (1/4 cup Pine-Sol + 2 1/2 cups water).


Pull the first one through and you're done!

Some hints:

- If you use an old baby wipes container, be SURE to use a permanent marker and clearly identify the box! (we don't want baby's bottom THAT clean!)
- I used Kleenex Viva paper towels because they are soft and strong, but I would probably try something different next time. While they're strong, they're kind of thin, so it makes it awkward when wiping because it kind of sticks to the surface you're trying to clean. They don't break apart, they're just hard to handle.
- I used just a small amount of the "X-tra Pine" cleaner and less than half the roll of paper towels to fill my wipes container, so I have plenty of supplies to make a refill once these run out.

I have found these wipes to be quite convenient and even my inner brat seems satisfied (for now). Have you found any cleaning alternatives to silence your inner brat (or maybe just your inner frugalista)?

Monday, March 21, 2011

Fresh Homemade Bread Is This Easy? Who Knew?


Yes, that is as yummy as it looks.

Why yes, actually I did make it myself. From scratch. No breadmaker.

No, I didn't slave away in the kitchen. It took about 5 minutes of hands-on time.

Flour, salt, yeast, and water.

Nope, nothing else, that's it. 4 little ingredients. Mix, mix. Let rise. Bake. Devour. Quickly, or your family members will get to it before you.

Sure, here's where I learned- Homemade Artisan Bread in Five Minutes A Day


Seriously, it's really good.


See, even Princess Picky-Pants loves it! (That's her third piece).

If I can do it, then you can definitely do it!! Are you going to try? ;-)

(It's okay if you don't- it's so easy to make I can make extra for you) :-)

Linking up to:

 http://linda-coastalcharm.blogspot.com/

Sunday, March 20, 2011

Spiritual Sundays: Choose to Write!


The volumes of journals I've written over the years

The urge to put pen to paper (or these days, fingers to keyboard) has been with me ever since I discovered that by putting letters together you could express ideas. I was only seven years old when I first started writing in a journal. It's the cute pink one you see below.


And here is my first entry from that day, April 19th, 1989:


I won the journal as a prize for a writing contest, and ever since then I have been a journal-keeper. During those very early years I wrote only a handful of times each year, but once I hit 8th grade my inner thoughts became too much for me to keep in my head and it became more of a regular, several-times-a-week habit.
My reasons for writing have varied over the years- when I was an adolescent and a teenager, I felt that nobody understood me, but when I wrote in my journal I couldn't mess up- there was no one to critique my words or tell me I was wrong. It was freeing for me.

As I grew up and left for college, I used my journals as a place to make sense of the world around me. I was facing new challenges and was often overwhelmed by the choices I had to make. Writing through these experiences helped me to clarify my thoughts and understand the person I was becoming.
Now, as a mother, my journals are a place to reconnect with myself and spend some time with my often-neglected spiritual self. They are also a place to record life events that I know would be lost in the recesses of memory if I did not write them down. There are so many times when I go back to read past journal entries and realize I had completely forgotten a certain event had occurred! I cherish my journals and the perspective they give me on my life.

If you want to start a journal, or even just improve upon your journal-writing, here are a few tips for you.

  • Choose a medium that's right for you. I used to use books, but now that my life is so hectic I find it better to journal on the computer. I use LDS Journal, a free site that allows you to keep your journal through their secure server (which is great because if your computer crashes it's still safe and sound), add photos to journal entries, automatically get e-mail reminders to write in your journal, and get your journal printed into an affordable high-quality hardbound book. It's awesome! I love it!
  • If you do use a standard journal, include a photo of yourself at the beginning of the book. It's fun to see how you change over the years.
  • Every once in awhile, do an entry where you just write down your daily schedule. Wouldn't you like to know what your mother's daily schedule was like when you were a young child and she was raising you? It's those little things that provide such insight into your life that will be invaluable for future generations.
  • Just write. Whatever's on your mind, just get it out there. If your mind goes blank when you sit down, then keep a pen and paper handy throughout the day and make notes of things to write about- funny things that happen, etc. Pretend that your journal is your best friend and you're going to call her at the end of the day. What will you talk about?
  • Don't stress about it. At this point in my life, I'm only writing about once a month, and while I'd like it to be more, I'm not stressing. (you get more here on my blog than my journal does!
I hope these tips help you to become a better journal writer, not just for yourself but for future generations. Start now and you'll be glad you did. :-)
Do you keep a journal? If so, what are your tips for better journaling?
Leave a comment and share!

Thursday, March 17, 2011

Emergency Preparedness on a Budget

With all of the natural disasters flooding the news in the last weeks, I have been motivated to take inventory of our family's emergency preparedness. If you're on a tight budget, this can feel overwhelming, but just like saving money, you can reach your goals by taking small and simple steps.

As I began to go through my 72-hour kit, I realized that many of the items I had stocked were items I already on hand, and anyone could take a few moments to create a very basic emergency kit with items already in their homes.
  • Extra clothing- If you don't keep much extra clothing, this is a great thing to get cheap at thrift stores. Ladies, if you're still growing your family, be sure to include pants with an expandable waistband. (Tip- store clothing in an extra pillowcase. This will keep it organized and can serve as a pillow in emergencies)
  • Small towel and/or washcloth
  • Basic toiletries- I actually keep a toiletry kit stocked with travel-sized versions of products I normally use, extra toothpaste and a toothbrush. Whenever I travel I just toss this in my suitcase, then I refill it when I come home and keep it near my emergency kit so that I can easily pack it if I have to evacuate.
  • First Aid supplies- even just band-aids and some pain medication will work. At least it's something!
  • Plastic bags
  • Pen and paper
  • Contact Info- List of family members' names, phone numbers, and photos, plus an agreed-upon emergency action plan (meeting locations, etc.).
  • Tissues- just put a few in a plastic ziplock bag.
  • Toilet paper- individually wrapped roll, if you have it
  • Matches- put these in a plastic ziplock bag also
  • Water- fill a water bottle with tap water and store it. If possible, store enough for 1 gallon per person per day, but even if you only have one bottle in an evacuation kit, that's still something!
  • Food- granola bars, canned food, etc. While these are not necessarily ideal, they are still something!
  • Baby Wipes- I just heard one of the guys on one of the professional emergency response crews on CNN saying that baby wipes are one thing they never leave home without.
  • Flashlight- You might not have an extra, but you can get these at the dollar store and they're essential.
  • Backpack or bag- You will need some kind of portable container to hold all of your emergency supplies. While a backpack is ideal, even a cardboard box or grocery bag(s) will do.
  • Shoes- In case of a sudden evacuation, you might not have a chance to change shoes or even put on shoes. Find an old pair of sneakers or maybe a pair of hiking boots you don't wear often- just something sturdy and comfortable- and stuff a pair of socks in the toe and use the shoelaces to tie them to your emergency kit. If you need them in the meantime, you can still access them easily.
  • Grab-and-Go List- If you are fortunate to have more than a moment's notice of an evacuation, you may have time to grab a few sentimental/useful items along with your emergency kit. Go around your house and make a list of items- photos, computer, kids' special lovies, journals, important documents, etc.- that you would want to take with you if evacuated. When possible, try to keep these items grouped together for easy packing. Decide now what kind of container you will use to pack them- maybe a container currently being used for winter clothes or a cardboard box- making these decisions now will save you panic and chaos later on!
These are just the basic basics. My purpose in this post is simply to show you that you don't have to run out and raid your local camping supply store in order to assemble a decent emergency kit. Remember- when an emergency strikes, some preparation is better than none at all.

When it comes to improving your long-term food and water storage, I believe that the best method is to just do it a little at a time. Wash out empty soda and juice bottles and fill them with tap water. Dedicate $1-$2 a week, if that's all you have, to increasing your food storage. That $1 can buy you a gallon of water and a can of vegetables. Continue to increase your supplies by just a little each week and you will see your storage grow!

I will say it again: When an emergency strikes, some preparation is better than none at all. I challenge you to DO SOMETHING TODAY to become better prepared!! You don't want to find yourself saying, "If only..."

Sunday, March 13, 2011

Happy Easter Banner! (and from the dollar store, no less!)


Can you tell I'm into this spring thing? I realized this week that I had virtually no Easter decorations, and I happened to find these fun little wooden shapes at the dollar store (10 per package):


They were just screaming out for mod podge, and I wanted a way to use them all together, so I decided to make a banner! But first, I wanted to spray-paint them white, so since it was raining outside I just put them in a big box.


I'm still debating whether or not this step was necessary- I just knew that my precision cutting skills and mod-podge technique are not top-notch, so I wanted a nice white border just in case. Since the tissue paper I was going to mod-podge on was translucent and a little on the dark side, I also hoped the paint would lighten them up a bit. But by the time I was done I ran out of spray paint, my finger really hurt, and the house was kinda fume-y. I think next time I'll go with a good ol' brush and craft paint.


Here is the lovely letter "A" all dressed up with its mod-podge treatment. I used my handy dandy Quickutz die cutter and white cardstock to do the letters (if you don't have a die cutter you could always use stickers or paint). Incidentally, the tissue paper came from the dollar store too!


I cut short lengths of sheer pink ribbon, folded them in half and hot-glued them to the back of each shape.


Then I just tied each shape onto one of two long ribbons (one for "Happy" and one for "Easter"), and tied those ribbons together in a knot. Then I added bows to make the ends prettier.


There she sits in all her glory adorning my fireplace! I chose the tissue paper for its muted cottage colors- it gave the banner a shabby-chic feel, which you don't often get with Easter decor because it's often all bright pastels and eggshell white. These colors were a little warmer, which really suited the warm wood tones in my home.


Happy Easter!! For only $3! (a little more if you don't have the ribbon or the mod podge). Time to figure out what else I can conjure up to decorate for Easter....

This week I'm linking up to the following blog parties:


Spiritual Sundays Re-Post: How Can I Help?

With the devastating global natural disasters this week, I wanted to re-post this Spiritual Sundays post from September of 2008. May we all keep the people of Japan and other earthquake and tsunami victims around the world in our hearts and in our prayers.

A woman in tears as she surveys the damage left by Hurricane Ike in Galveston, Texas.
I wrote recently on the topic of giving (see Give A Little Bit), and I would like to go back to that topic a bit today. I remember that about this time a few years ago after Hurricane Katrina had hit the Gulf Coast, I was really struggling with feelings of helplessness. I remember watching a woman who was in tears because her months-old baby needed formula and she had none to give him. I cried right along with her and desperately wished I could just go give her some, and take her and her baby and bring them home with me!

There was so much need there, so many people in desperate situations, and I felt like there was nothing I could do to help. At one point, I was so distraught that I went to my knees in prayer. I asked the Lord what I could possibly do to help these people. I knew that with 2 young ones myself I could not just pack up the car and drive myself down there like so many others were doing. I didn't have a lot of money to give. I prayed that I might know of a way that I, singular and small though I may be, could somehow help.

Heavenly Father touched my heart with an answer that filled me with comfort. His answer came four-fold:

1. Give what you can. Give as much as you can and your offering will be enough.

2. Just pray. Pray for those who are afflicted and I will hear your prayers and uplift them.

3. Learn. Learn from this terrible disaster and prepare yourself for the same. You never know when it could be you, and the best thing you can do is to be prepared.

4. Be grateful. Look around you and be grateful for your comfortable home, your health, and your safety. Quit complaining about meaningless troubles and express gratitude to God for your blessings, for there are many who are not as fortunate as you.

Now when I see disaster and tragedy I think of this counsel from Heavenly Father and I try to follow it. I donate to our church's Humanitarian Aid fund that goes to assist hurricane victims and other victims of natural disasters; I pray privately and with my family for those affected by terrible circumstances; I do my best to have sufficient supplies stored for my family and a plan in place in case of an emergency (see Water, Water, Everywhere); I try to curb my complaining and embrace feelings of gratitude, and express those feelings to those around me and to my Father in Heaven.

Perhaps there are many of you that can do more, and I encourage you to do so. But if you are like me and you feel helpless when confronted with scenes of suffering, I would ask you to go to your Heavenly Father and consult with Him that He might counsel you in His will for you. He is there to answer your prayers if only you ask.

In closing, I would like to say that I am truly grateful for all that I have; for my family, my home, and my beautiful life. The Lord has blessed me far more than I deserve, and I appreciate every bit of it! May He watch over all those who are in need of His care at this time, and may He be with them in their times of trial, to give them strength and comfort where others cannot. May they look to Him for guidance and relief, and may His Spirit be with them always.

Wednesday, March 9, 2011

Couponing: How I Do It


It has been awhile since I've posted about couponing, but I've had several friends who have expressed interest in the subject recently so I thought it might be helpful to just give you a brief tutorial on how I do it and how you can get started. I'll keep it simple and easy to follow so that you can feel confident enough to give it a try!

Here is my usual routine, with a few pointers for you if you're just getting started:

1. Get the newspaper! As abundant as online coupons are, your local newspaper is the most plentiful resource for grocery product coupons. So order your local newspaper and start stocking up. If you have friends who receive the newspaper, see if you can snag their coupons too, if they're not using them. The more you have, the better!

2. Organize your coupons. I used to clip every coupon, simply because it made it much faster to find what I needed. However, I just don't have the time or energy for that these days, so now I simply file coupons by their insert date, which is the date the coupons came out in the newspaper. I have a hanging file folder for each month. Some people do clip every coupon and organize them by product type, which is helpful if you're looking for product coupons as you're shopping in the store, but I am usually shopping with kids so I don't bring my entire coupon stash with me. So for me it's easier to sort by date and leave 'em at home.

3. Find the deals. I am a personal fan of www.couponmom.com. You need to register to use the site, but it's free. Each week I simply go to her website and click on "Grocery Deals by State." That takes me to a list, and since I usually get good deals at Kroger, I click on "VA- South/Central Kroger." I then get an itemized list of every sale item along with its coupon matchup (really, why do all that work when somebody else has already done it for you?).
I typically use the arrows at the top of the screen to sort the list by "% saved" (just click the down arrow at the end of the last column header), going from the highest percentage (usually FREE!) down to the lowest. That way, all the best deals are shown right there at the top of the list. I can then scan the list for the deals I want and use the check boxes on the left-hand side to select those deals. Once I'm done, I click "Display Selected Deals" and a list of only the deals I've selected will appear on my screen.

4. Match the coupons. This is the most time-consuming part! Once I have my list of "Selected Deals", they are automatically arranged in order by insert date ("Cpn. Out" column). That's pretty handy because that's how my coupons are organized! So I just go through my files and search the inserts for the relevant coupons. Once I find them, I clip them and place them into an envelope with the store's name on it. Then I can just print out my list straight from that screen, tuck it into the envelope with my coupons and I'm ready to go!

5. Go shopping! This part can be a bit overwhelming. I find it helpful to know the layout of my store and to try to arrange my list accordingly. I also will always grab the current week's sale flier when I first walk into the store, because sometimes it can be tricky to know what particular brands are a part of a particular sale, and the sale flier is usually pretty specific. Pay attention to any sale stipulations; for example, Kroger often has promotions that require you to purchase 10 participating items before receiving a discount. Don't forget to count!
If something you need is not on the shelf, be sure to check with a store employee to find out if they might have more in the back. If not, you can usually get a raincheck for the item- this is essential if it's a killer good deal! Don't be afraid to ask!

6. Pre-checkout check. I usually try to find a quiet corner of the store where I can arrange my coupons just before I check out. This gives me the opportunity to double-check and make sure I've gotten everything on my list and that I have the correct numbers of items (SO annoying when you go to check out and realize you can't use a coupon because it was $1 off 3 and you only got 2!!). I also put away any coupons I will not be using, either because I couldn't find an item, the deal wasn't for the item on the coupon, or I just chose not to purchase the item. These few minutes help the checkout process go much more smoothly.

7. Check-out. This is usually pretty straightforward when it comes to grocery store couponing- you just put the items up there, hand over your store card and the coupons and you're good to go! One thing you do need to watch for, however, is to be sure you receive any "catalinas" you may be owed. These are coupons that print out with your cash register receipt, and sometimes will be like store credit, saying, "$3 off your next purchase," or something like that. These typically come as part of a store promotion, so you will know about them ahead of time. They are money in your pocket, so if your list says you're supposed to get some, be sure you look for them at checkout, and if you don't receive them for any reason, don't be afraid to speak up!

8. Yay!! Now you celebrate because your cash register receipt says you saved $50! (or something like that) Take your goodies home and be happy you're so smart. ;-) As you're doing your happy dance, be sure to make a note of any catalinas you may have received (those free money things I mentioned that you get at checkout) and when they expire. Don't want to waste them!

I hope this post has demystified the couponing process for you, at least somewhat. Just like any skill, the best way to learn it and feel comfortable with it is to DO IT! The best way to begin learning couponing is to start small- choose 3-6 deals that you want to try to get with coupons, make your list, gather your coupons, and go shopping. Once you have a few small trips under your belt, you will feel more confident to try more complicated scenarios. Before you know it, you'll be slashing your grocery budget and planning an addition onto your house to hold your surplus!

Do you have any couponing questions or concerns? Just let me know! I'm happy to be of assistance!


Sunday, March 6, 2011

IT'S SPRINGTIME!!!!!


Well, it is in my house, anyway. I got tired of waiting to see real flowers outside so I decided to make my OWN flowers inside. Aren’t they loverly?

Ever since I saw these on the Martha Stewart show a few weeks ago I knew I wanted to make them. This post will not be a tutorial because hey, Martha already did a lovely video for you! You can find the link to the video here. I made peonies, which is the second kind of flower they make, so it’s at the end of the video.

Here are my strips of bleach-dipped tissue paper hanging to dry:


Starlet is helping me “fringe” the yellow tissue paper for the centers of the flowers:


Here is a petal-less flower awaiting some pretty pink and white petals:


Shaping the petals with some scallop-edged scissors:


The finished product!


Here are a few of my tips for you:

1. When dipping and hanging the strips of tissue paper to dry, be very careful, because for starters, you just dipped them in bleach. That stuff has the potential to ruin so very many things if it drips on them! I dipped mine near the sink and then unfolded them over the sink, making sure all the drips got out. I also used “splashless” bleach, which is slightly thicker than regular bleach, so not as hazardous. Secondly, you are using tissue paper, so it is very fragile, especially when wet!! Be very gentle when unfolding it, as it will stick together and then tear. Just go slow!

2. The bleached tissue paper takes from 30-40 minutes to dry. I used the time while mine were drying to cut the yellow fringes and put them together with the stems.

3. If you’ve never used floral tape before, it can be a bit tricky. I personally kind of hate the stuff, but that’s beside the point. Anyway, I have found that the best method to use is to stretch it nice and tight and kind of smoosh it down by rubbing over it with your fingers as you go. It’s the kind of tape that doesn’t really feel sticky, but it sticks to itself if you use the technique I described. (And, incidentally, if you use a touch of scotch tape here or a dab of glue there and just cover it with the floral tape, no one has to know. Promise!)

The best thing about these flowers is that they are made of tissue paper, and tissue paper is very forgiving, especially when you’re making flowers! You can just kind of snip and scrunch and shape the flower however you like.

I was very pleased with my little blooms and I am so happy to see flowers again! Would it be weird if I stuck them in the ground outside my window? Probably.

The girls had fun putting them in their hair!


(Little Boo can't quite decide between the pixie stick and the flower...)

Anyway, I just loved the effect of dipping the tissue paper in bleach, and I wondered, What else could I use this effect with? Here's a hint...


I'll show you the finished product later this week!! ;-)

I am linking up with Keeping It Simple's Motivate Me Monday the Shabby Chic Cottage's Transformation Thursday, DIY By Design's "Swing into Spring" (see button below), How Sweet the Sound's Pink Saturday and So You Think You're Crafty's I'm Crafty Party this week! Check out those blogs for more fantastic crafty ideas!


Paper Issues Blog Design

Spiritual Sundays: Reaching 100%

A couple of weeks ago I had the privilege to attend a bi-stake LDS women's conference in Chesterfield. The conference as a whole was wonderful! They had a remarkable keynote speaker, 11 different classes to choose from, and then a beautiful musical presentation to finish it off. After I left, I felt spiritually stuffed! I felt much like I do after I leave the temple. The spirit there was simply amazing.

One particular part of the conference that stood out to me was a class that I took entitled, "Depression/Finding Balance." I chose to take the class because like anybody, I have those times when I just get into some kind of a funk, and it can be hard to get out of it. I thought that the class might provide me some insight on not only how to alleviate some of that blue-funkiness, but also how to avoid it by finding balance in my life.

The class was taught by a gentleman who is a clinical social worker, which is very close to a psychologist or psychiatrist. He works with people who suffer from depression, as well as people who are struggling with family problems, etc. He gave a very informative presentation on the different kinds of depression, natural mood lifters, and ways to help others who might be suffering from depression. But the thing that struck me the most was what he told us at the end of the class. I will paraphrase.

In the morning as soon as you get up, get down on your knees in prayer. Express your gratitude to your Father in Heaven for the blessings He has given you. Feel joy for the evidence of His hand in your life. Then bring unto Him your weaknesses. Lay them all out before Him, and tell Him of your shortcomings. Tell Him your worries, your concerns, and ask for His help. Ask Him to remove the obstacles you face, and if He chooses not to remove them then ask Him to give you the strength to overcome them; if nothing else, ask Him to teach you through them. Close your prayer, and then go about your day, doing the best you can and trusting in God to be there right alongside you.

As you prepare for bed in the evening, get back down on your knees. Once again express gratitude to the Lord for His hand in your life. Then present your day to Him as an offering, and show Him how you've done with the obstacles you've had to face. You will have made mistakes- nobody is perfect. It's possible you may have only been able to manage 40%, and that's okay. Just come to Him and say, "Lord, today I have done my best and I have managed 40%." Then invoke the power of the atonement, and say, "Wilt thou cover the other 60%?" Even if it's only 30, or 20, or 10- bring it to Him and He will meet you where you stand, if you only ask. Do this, and with God, you will always go to sleep at 100%.

"And if men come unto me I will show unto them their weakness. I give unto men weakness that they may be humble; and my grace is sufficient for all men that humble themselves before me; for if they humble themselves before me, and have faith in me, then will I make weak things become strong unto them." -Ether 12:27

Today in Sunday School we were discussing the scripture in Matthew 11 that says, "Come unto me, all ye that labour and are heavy laden, and I will give you rest. Take my yoke upon you, and learn of me; for I am meek and lowly in heart: and ye shall find rest unto your souls."

The teacher asked, "What does the Lord mean here when he says, 'Take my yoke upon you'?"
A wise gentleman in the class explained that often, when two oxen are yoked together a weaker ox will be yoked with a stronger ox so that the shortcomings of the one will be made up for by the strength of the other. He said that the Lord invites us to "take [His] yoke upon [us]," meaning to share the weight of our burdens with Him and He will give us rest from our trials.

I loved this analogy because it shows the Lord wanting to be side by side with us, making up for our weaknesses. How can we not pull through when we have God pulling with us?

I am thankful for wise teachers who help me to understand the blessings of the Atonement in my life, and I pray that I can be diligent in calling on the Lord to strengthen me in my weakness. I know that through Him I can reach 100%.

To learn more about what I believe as a member of the Church of Jesus Christ of Latter-day Saints, please visit www.mormon.org. :-)

Wednesday, March 2, 2011

What $20 Can Get You at the Goodwill Outlet


It's tax return time again and we just recently got ours which brought us to 81% of our 6-month emergency fund. Yay! To celebrate, I decided to scratch my shopping itch and hit the Goodwill Outlet to see what kinds of goodies I could find. So now just pretend that you're a friend who has come over to visit me and I'm saying, "Hey! Check out what I bought today!!"
Above are a few picture frames that I'll be using as part of a project sometime this month, along with a fruit basket, a pretty storage box, and another piece of art on canvas that I will be repurposing at some point in the future.

I just loved these two little books- I think they would make wonderful little gifts. I especially love the idea of the "Baby Dear" book as part of a baby shower gift!

And isn't this little apple charm on the end of the ribbon bookmark just so fun? I can imagine giving this book with some freshly picked apples in the fall. :-)

And here are a few more sweet books! I have always wanted to read "The Five People You Meet in Heaven", and then that little red book on top is a book of Love Poems (LOVE IT!) and those two books underneath it are little pocket-sized hardbound copies of Great Expectations and Portrait of a Lady. And the pages are trimmed in gold. They were just so pretty I had to have them. Speaking of things that were so pretty I had to have them....


Love this skirt! It's frilly and fun and sophisticated too.


And when I brought it home I happened to discover that it perfectly matched this other Goodwill Outlet top I purchased a few months back!


And wouldn't you know it? It matched this one too! It was like fashion nirvana. I was positively giddy.


This top is Aeropostale and I just loved that little owl and all the leaves.


I love brightly-colored sweaters because you wear sweaters in winter and it's always so cold and gray in winter. I gotta at least see some color when I look in the mirror!


A great brown velour track jacket (I love zip-ups for spring and fall- great for layering!) and an oatmeal-colored v-neck tee that's the nice long lean shape I like.

So that's just a few of the things I bought with my $20!

Wait, just a few you say?

Yes, not pictured here are another sweater and 18 more books.
Yes, 18.

I don't want to bore you that much! But just in case you were wondering, I got some great books for the kids (workbooks, princess books, touch-and-feel book for Little Boo), a book on fun activities and crafts to do with preschoolers, a couple of books for an upcoming project (which, of course, I will share with you when I'm done), and 6 books that I am selling on craigslist that should bring in $20 if they all sell.

Yes, $20. That should pay for my little shopping spree today.

Thanks for stopping by, friend! Have you found any awesome deals lately??